
If you’re building a new PC (probably one of the best PC builds) with Microsoft’s operating system, you probably need a Windows product key. Yes, you can run Windows 10 or 11 without a key, but this “deactivated” version of Windows has an annoying watermark in the bottom right corner of the screen and has some features – change wallpaper for example function to – – disabled.
So having a Windows product key can be very useful, but if you’re replacing a computer that already has a valid Windows key, you may be able to transfer the key to your new PC. Whether you can transfer your Windows license depends on the type of license you have. This is explained below. But if you want a new key, check out our article on how to get Windows 11 or 10 for free or cheap.
If you have a transferable product key, here’s how to move it from one computer to another. How you transfer depends on whether you have a “digital” (associated with your Microsoft account) or a traditional license (where you move the ID key itself).
Are Windows product keys transferable?
When it comes to transferability, there are two types of Windows keys:
- OEM Key: It should not be transferable. These are the keys manufacturers use to install Windows on pre-built PCs. It’s also a key available from discount key vendors such as Kinguin. However, you can always try.
- retail (aka “full package product”) Key: transferable. These keys are expensive, typically costing over $100. But there is always the possibility that there is something on your computer (from a previous upgrade) that you don’t know about.
If you don’t know what kind of Windows product key you have, you can find out by digging up the key itself.
Find your Windows 10 or 11 product key
Unless you carefully kept the key from the last time you installed Windows, you probably need to find your product key. To find out what Windows 10 or 11 product key type and key number you have, we recommend downloading and running it. magic jelly bean key finder (opens in new tab).
The key itself is listed as “CD Key” and the version of the license may also be under the “installed from” callout.
Check if you have a digital license
If your key is transferable and you want to transfer it, you need to know if you have a “digital license” or a regular license. A regular license allows you to transfer the product key from one computer to another by deactivating the product key on the old PC before entering it on the new PC.
However, if you have a digital license, that means your number is tied to your Microsoft account, and to transfer your license, follow a different procedure to deactivate your old PC from your Microsoft account settings menu. is needed.
To check if you have a digital license, you need to do the following: Access the activation settings page on Windows. You can get there by searching for “activation” in the search box and clicking the top result.

If the activation screen says you have a digital license, follow the digital license transfer instructions below. Otherwise, follow the non-digital Windows 10 or 11 product key transfer instructions below.
How to transfer a digital Windows license to a new PC
Entering a product key on a new PC won’t work if your Windows license is “digital”, i.e. tied to your Microsoft account. My new computer won’t activate. Instead, you should deactivate your old PC using the settings menu on the Microsoft website and use the troubleshooting features in the activation menu on your new PC.
1. reset window Alternatively, completely wipe the drive on your old PC. See our tutorial on how to reset Windows 10 or 11. If you don’t do either of these things, your computer will still be considered registered with Microsoft and you may not be able to activate the same key on your new PC.
2. Install Windows 10 or 11 on your new PC, you do not need to enter a product code during the installation process. When prompted,[キーを持っていません]Click.

3. login to your account at microsoft.com.
Four. [マイ Microsoft アカウント]go to the page. from the drop-down menu under your username[マイ Microsoft アカウント]or go directly to account.microsoft.com to get there. (opens in new tab) After already logged in.

Five. [すべてのデバイスを表示]Click You can view a list of all devices associated with your account.
![[すべてのデバイスを表示]Click](https://cdn.mos.cms.futurecdn.net/AZudnGAy5L3Np87vy5aDaN-1200-80.png.webp)
6. scroll down When Select computer I want to disable it.
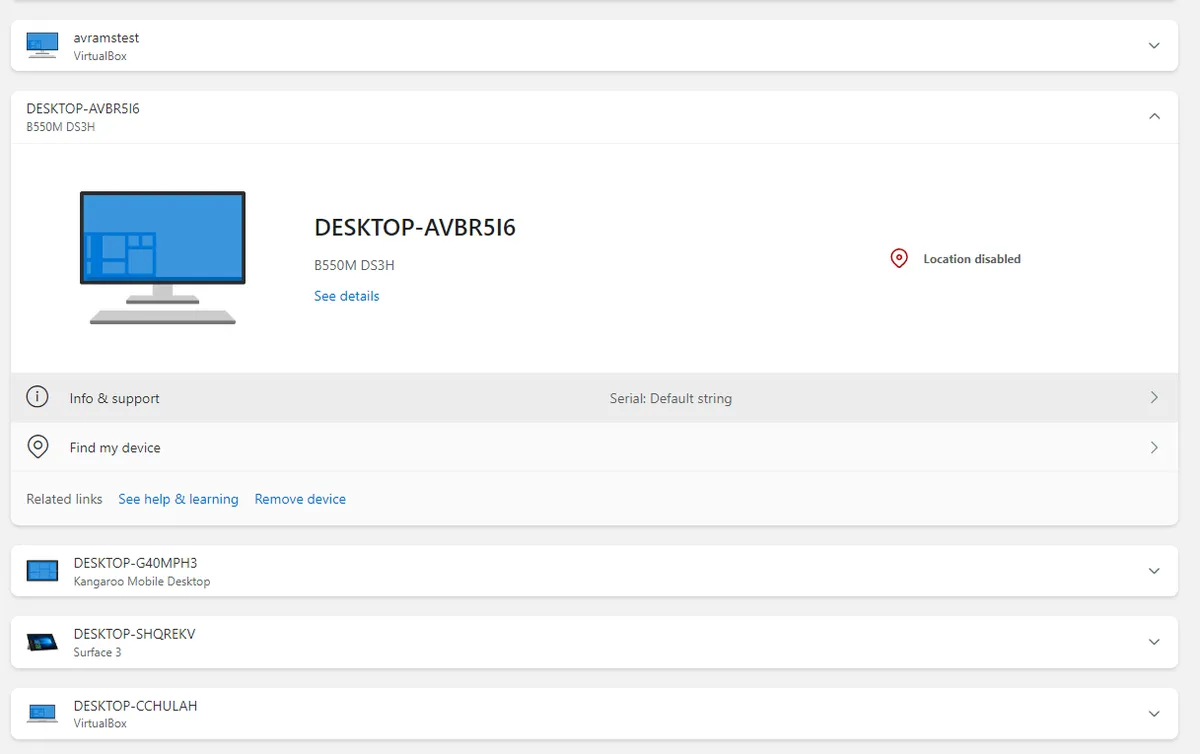
7. Click Info & Support.
![[情報とサポート]Click.](https://cdn.mos.cms.futurecdn.net/bawkPrEHtR3NEbayb6HtFh-1200-80.png.webp)
8. [このデバイスを削除]Click It’s in the upper right corner.
![[このデバイスを削除]Click](https://cdn.mos.cms.futurecdn.net/8D3qoyoYTsKzt2uSevXRP5-1200-80.png.webp)
9. Check “I’m ready to remove this device” When [削除]Click.
![[このデバイスを削除]Click](https://cdn.mos.cms.futurecdn.net/CPiYurgsuZS9bhUJ3SnkDC-1200-80.png.webp)
Ten. Go to the activation settings menu on a new PC. The easiest way to get there is to search for “activation” and click the top result.

The screen says Your copy of Windows could not be activated. If for some reason it says it’s enabled, it’s already done and you can stop here.
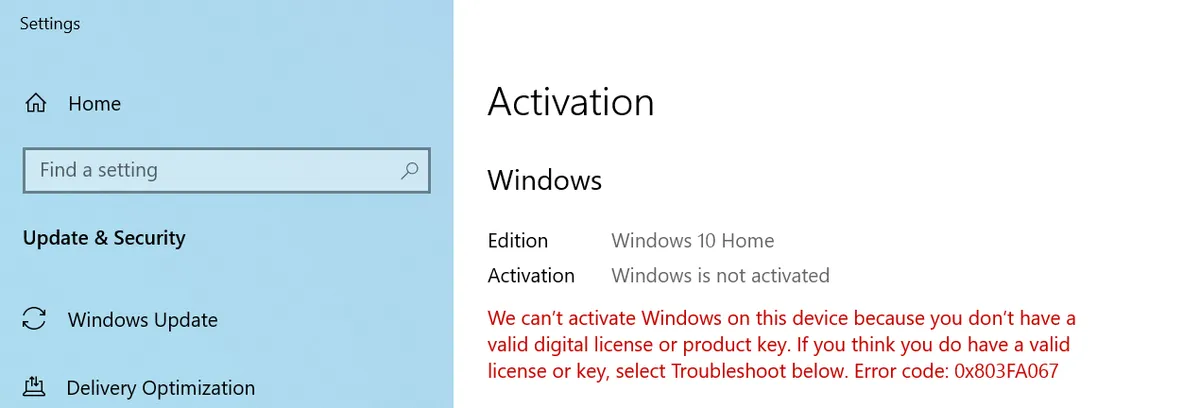
11. Click Troubleshoot.
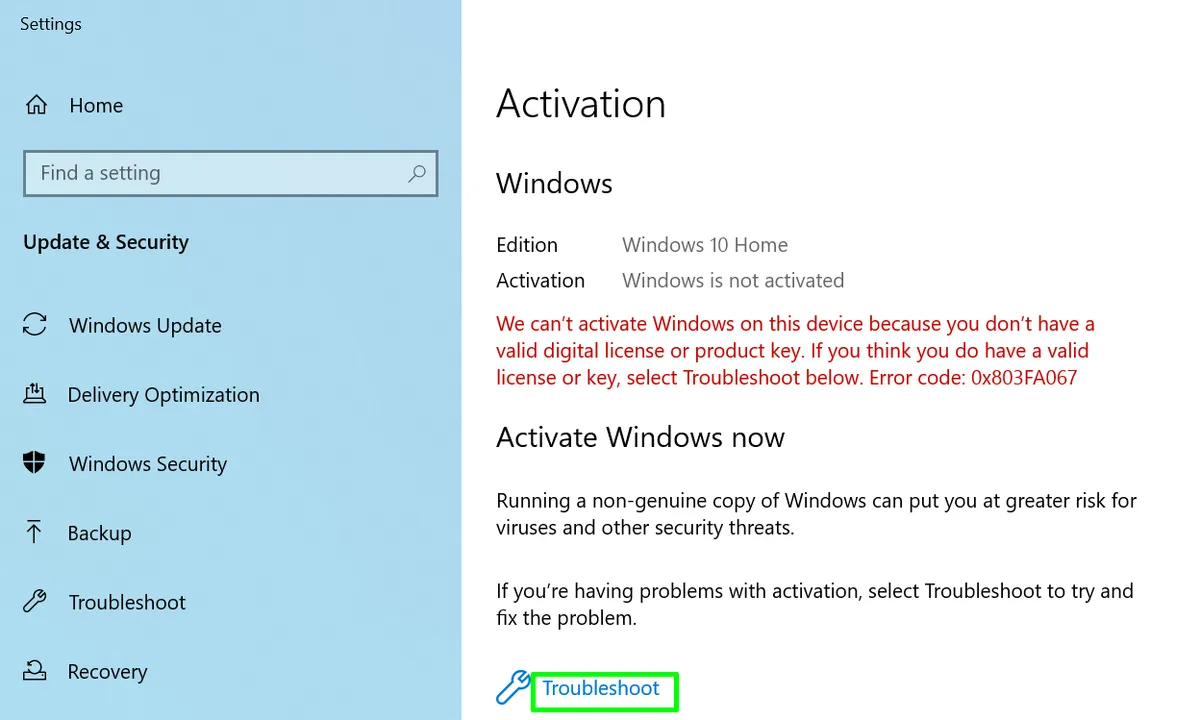
A dialog box will probably appear telling you that Windows could not be activated.
12. Click “Changed Changed” Recently, the hardware of this device. “
![[このデバイスのハードウェアを最近変更しました]Click.](https://cdn.mos.cms.futurecdn.net/YtuxNyaJjbDBbPRo6qt6fU-1200-80.jpg.webp)
This will notify Microsoft that your computer has undergone a major upgrade. Never mind that you probably have a brand new PC with a new motherboard (although some components may be the same). Think of your new PC as an upgrade.
13. Select new PC you are using Click “This is the device” I’m using it now and activate.

After a few seconds, you should see a confirmation screen that says “Windows has been activated.”

Your new PC is now activated.
How to transfer a Windows product key (non-digital license)
If you don’t have a “digital license” for your Windows 10 or 11 product key, you’ll need to actually enter the alphanumeric key into the activation screen on your new PC. If you haven’t wiped your old PC yet, we recommend that you officially remove the product key, effectively “deactivating” it. This helps give the impression that Microsoft isn’t using the key.
Here’s how to deactivate Windows 10 or 11 and activate a new PC with the same key.
1. Start Command Prompt as AdministratorSearch for cmd in the search menu, right click on the top result and select[管理者として実行]You can access it by selecting . If Windows User Account Control asks for permission,[OK]Click.

2. come in slmgr/upk at the command prompt press enter.
slmgr /upk A window will appear stating that the product key has been successfully uninstalled.

3. Enter slmgr.vbs /cpky at the command prompt
slmgr.vbs /cpkyThis will remove the product key from the registry itself and officially deactivate your PC. message is displayed. “The registry product key was successfully cleared.”

5. Enter slmbr.vbs /dli Confirm that the product key has actually been removed.
slmgr.vbs /dliI get a message that I don’t have a product key. It means it’s gone.

Also, the Activate Windows Settings screen displays a red message that your copy of Windows is not activated. But you don’t need to check it.

6. Enter your product key on a new PC. If you haven’t installed Windows yet, you can enter the key during the installation process. If you have Windows installed and have not yet activated it, go to the activation settings menu and[プロダクト キーの変更]Click to enter.

If the key doesn’t work at this point, you’ll have to wait a while and try again or get a new key.


