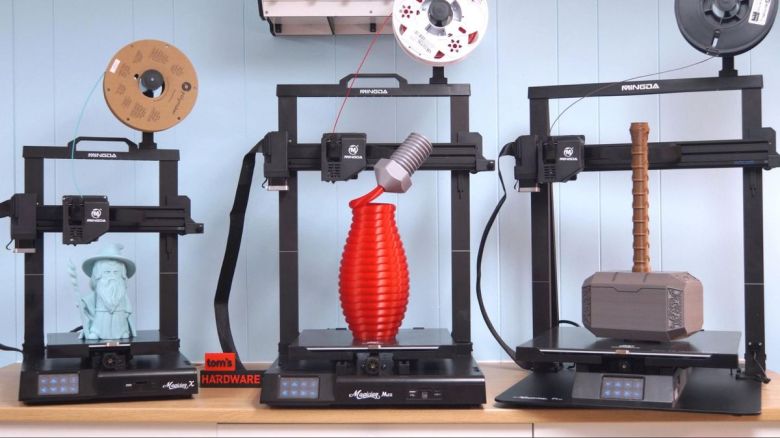
If you want a little more build volume but don’t want to turn your back on a super-large 3D printer, the Mingda Magician Max is for you.
This printer has a 320 x 320mm build plate, 10mm larger than the Creality CR10 and is considered the baseline for large format printers. It’s also the middle sibling in the Mingda’s Magician lineup, sitting in between the smaller ones and virtually identical. Magician X and oversized magician pro.
All three have the exact same direct-drive hotends, easy-to-use bed leveling systems, and super-tacky coated glass build plates.Like the Magician Pro, belt-synced dual Z-axes and wide It has a Y-axis and has better stability.
I took the Magician Max out of the box, leveled and printed in about 20 minutes. That makes it easier to use than many products. best 3d printer.
Specifications: Akitatsu Magician Max
| machine footprint | 650 x 586 x 675 mm (25.5 x 23.0 x 26.5 inches) |
| build volume | 320 x 320 x 400 mm (15.7 x 15.7 x 15.7 inches) |
| machine weight | 10 kg (22 lbs) |
| material | PLA/PETG/TPU/ABS |
| Extruder type | direct drive |
| nozzle | .4mm (replaceable) |
| build platform | coated glass, heating |
| filament runout sensor | yes |
| bed leveling | auto touch sensor |
| connectivity | SD card, USB stick, USB-C |
| interface | Color LED touch screen |
Mingda Magician Max: Included in the Box
Magician Max comes with tools to assemble the printer and some accessories such as spare nozzles, extra Teflon tubes and a full size SD card. A small sample of white PLA is included for the first test print.
The SD card contains a PDF copy of the manual, a copy of Cura 4.13, and one sliced .gcode model for testing.
The printer does not come with scrapers for removing prints or snips for cutting filament, but these are easy to find at your local hardware store.this is my favorite scraper (opens in new tab) If you are looking for something special.
Meitatsu magician Max’s design

Magician Max is very similar to other Mingda printers in the Magician lineup. Rather than a DYI kit, it is a box-shaped design that looks like a finished product. The wide base hides a tool box for storing power supplies, motherboards, and wrenches and spare nozzles.
Like the larger Magician Pro, this one has dual Z-rods that sync with the top belt. The Y axis is very wide and provides a stable base. Cable management is organized, with ribbon cables wrapped in black mesh from the base to the X-gantry, and fabric-wrapped ribbon cables completing the journey to the tool head.

I was really happy to find a slot that accepts both full size SD cards and USB sticks. We hope to see more 3D printers using this system.
Other small touches make Magician Max easier to use. It features a belt tension knob when you need to fine-tune the tightness, a frame that supports the glass plate with just one clip, and a graphic menu for an easy-to-navigate interface.

The auto-leveling system physically hit the bed at 16 points and there was no need to adjust the PLA’s Z-height. PETG requires a bit of crushing, so I used baby steps to supplement the material as needed.
My biggest complaint is the coated glass. This is the same for all three Mingda machines. It holds incredibly well – great for gluing prints – but refuses to throw the item away when the print is complete. requires a lot of persuasion.
Assembling the Meitatsu Magician Max

Magician Max follows the industry trend of 90% pre-assembled printers. The gantry slides on brackets in the baseplate and is held in place by four bolts (two on each side). No need to tilt the printer to install bolts from the bottom.
Most plugs are an inch or two away from the connection point, making electrical connections easy to organize.
Once everything is connected, it’s a good idea to check the bolts, wheels and belts for excessive wobble. If the wheel is loose, the eccentric nut can be easily tightened with the included wrench.
The last step in assembling a 3D printer is usually turning on the power switch. Magician Max has done away with this step – it’s already set up for US forces. I’m here.
Leveling of Mage Magician Max

Magician Max has an automatic leveling system where the nozzle physically contacts the glass plate. The printer automatically warms up before leveling, so you don’t have to worry about the plates swelling or warping as they go from cold to hot.
To level the printer, from the main menu[水平]Choose. After the printer warms up, he does 16 taps around the bed. I didn’t have to adjust the Z height after leveling, but there is a command if you need to tweak the settings.
Loading filament into Mingda Magician Max

Loading this direct drive is very easy. Select Preheat and tap the type of filament you are using. Magician Max heats up quickly, so you won’t have to wait long. Insert the filament into the upper loading hole of the drive. Then tap the load button on the screen. Keep the speed normal and increase the advance to 10mm.
Magician Max’s drive has no reverse, so it has no choice but to move forward. When you want to change colors, just cut the filament and advance the drive 30mm. Put the next filament into the hole and continue until another color comes out of the nozzle.
The lack of reverse may seem tedious, but after testing all three Mingda Magicians, I have yet to have a clogged nozzle. Keeping the filament moving forward seems to avoid bogging down with this style of direct drive.
File/software preparation for Mingda Magician Max

Magician Max comes with a copy of Cura 4.13.1 and instructions on how to set up custom profiles. The same steps apply to using PrusaSlicer, if desired.
After I received my Magician Max, Mingda announced that their latest three printers (Magician, Magician Pro and Magician Max) were all submitted to Cura. Available in Cura 5 and above. This greatly simplifies printer setup and allows you to start with a profile that is tailored to your machine.
Printing with Mingda Magician Max
I started with a pre-sliced pumpkin monster test print using the white PLA sample provided. The print included a raft, but it didn’t come off. The print was pretty clean, but I could see some Z-banding on the bottom of the pumpkin.

I wanted to print something big to show off Magician Max’s build volume.of Printception small vase It was just a print out of Make Anything, enlarged to 200% size.used Atomic Golden Blood Diamond Translucent PLA At 0.2mm layer height and 65mm. It took 36 hours and 9 minutes to print.

This is an enlarged view of the Printception nozzle, printed in a separate drawing. Prusament PLA Galaxy Silver For .2mm layer height, 65mm, 200%. It took 8 hours and 38 minutes to print. Z-banding is seen on the flat sides of nozzles printed in two parts without support.

I moved to PETG and printed this awesome fairy door Teal Yucca Seppanen PolyMaker Polylite PETGIt took 5 hours and 14 minutes for a layer height of 0.2 mm. The textured nature of the print hides the Z-banding, leaving only a slight loop visible at the top of the door.

Despite having a direct drive, the TPU was only moderately performant.printed this powder puff unicorn by Chao Core Tech in Matterhackers Build Series Translucent Purple TPU (opens in new tab), using layer heights of 40mm and 2mm. You can see that there are threads left between the tail and rump and between the legs. Otherwise this is a great support free print and the strings can be easily removed.

Conclusion
Retailing at $479, the Mingda Magician Max is a 3D printer with more than average print space that doesn’t require an upgrade. Like its siblings, Magician Max is designed as a complete product that is easy to set up and easy to use. The only thing that needs replacing on this machine is the worn brass nozzle. This is not a machine for mods. This is for people who want to make cool stuff right.
The easy-to-load direct drive handles material very well and is a low-maintenance extruder that novices will need and experienced users will enjoy. Automatic leveling is precise and hassle-free. This is another feature that removes obstacles in your 3D printing journey.
Mingda could definitely improve on the bed of glass – it’s too sticky and refuses to give up the goods even when the ice cools. Flexplate is a welcome addition to the lineup. is. It’s very easy to remove for serious scrapper action or to clean up, as the build plate is only held on by one of her clips.
If you’re looking for a slightly cheaper 3D printer with the same build size and a less sticky build plate, Anycubic Cobra PlusPriced at $439, it’s Editors’ Choice and Our Pick Best Large Format FDM Printer.


